Web Forms Model Binding Part 3: Updating and Validation (ASP.NET 4.5 Series)
This is the fifth in a series of blog posts I'm doing on ASP.NET 4.5.
The next releases of .NET and Visual Studio include a ton of great new features and capabilities. With ASP.NET 4.5 you'll see a bunch of really nice improvements with both Web Forms and MVC - as well as in the core ASP.NET base foundation that both are built upon.
Today's post is the third of three posts in the series that talk about the new Model Binding support coming to Web Forms. Model Binding is an extension of the existing data-binding system in ASP.NET Web Forms, and provides a code-focused data-access paradigm. It takes advantage of a bunch of model binding concepts we first introduced with ASP.NET MVC - and integrates them nicely with the Web Forms server control model.
If you haven't already, read the first two parts in this series on Model Binding, which covers the basics of selecting data via the new SelectMethod property on data-controls like the GridView, as well as filtering that data based on input from the user.
In today's post we'll look at how Model Binding improves the data-binding experience when updating data.
Getting Started
Let's start with the GridView sample from the previous post, configured to use Model Binding to show some data from the Northwind Products table. The GridView calls the configured GetProducts method, which in turn is using Entity Framework Code First to simply return the Products property on my Northwind data context instance.
It's important that the DataKeyNames property is set to the primary key (or keys) of the model type, so that the GridView can round-trip this value with the page between the browser and server.
<asp:GridView ID="productsGrid" runat="server" DataKeyNames="ProductID"
ModelType="ModelBindingPart3.Product"
AllowPaging="true" AllowSorting="true" AutoGenerateColumns="false"
SelectMethod="GetProducts">
<Columns>
<asp:BoundField DataField="ProductID" HeaderText="ID" />
<asp:BoundField DataField="ProductName" HeaderText="Name" SortExpression="ProductName" />
<asp:BoundField DataField="UnitPrice" HeaderText="Unit Price" SortExpression="UnitPrice" />
<asp:BoundField DataField="UnitsInStock" HeaderText="# in Stock" SortExpression="UnitsInStock" />
</Columns>
</asp:GridView>
Below is what our code-behind file (which contains the GetProducts() method) looks like:
public partial class _Default : Page
{
private Northwind _db = new Northwind();
public IQueryable<Product> GetProducts()
{
return _db.Products;
}
}
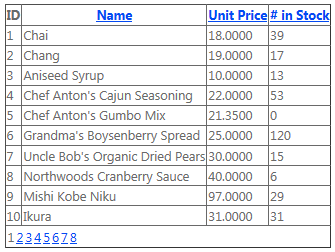
Running this page yields the expected result of a table containing the product data:
Because our GetProducts() method is returning an IQueryable<Product>, users can easily page and sort through the data within our GridView. Only the 10 rows that are visible on any given page are returned from the database.
Enabling Editing Support
We can enable the GridView's inline row editing support by setting the AutoGenerateEditButton attribute to "true". The GridView will now render an Edit link for each row, which the user can then click to flip the row into edit mode.
Next, we need to configure the GridView to call our update method (which we'll add to our code-behind in just a bit). We can do this by setting the UpdateMethod attribute to the name of our method, in this case "UpdateProduct". Our GridView mark-up now looks like this:
<asp:GridView ID="productsGrid" runat="server" DataKeyNames="ProductID"
ModelType="ModelBindingPart3.Product"
AllowPaging="true" AllowSorting="true"
AutoGenerateColumns="false" AutoGenerateEditButton="true"
SelectMethod="GetProducts" UpdateMethod="UpdateProduct">
<Columns>
<asp:BoundField DataField="ProductID" HeaderText="ID" />
<asp:BoundField DataField="ProductName" HeaderText="Name" SortExpression="ProductName" />
<asp:BoundField DataField="UnitPrice" HeaderText="Unit Price" SortExpression="UnitPrice" />
<asp:BoundField DataField="UnitsInStock" HeaderText="# in Stock" SortExpression="UnitsInStock" />
</Columns>
</asp:GridView>
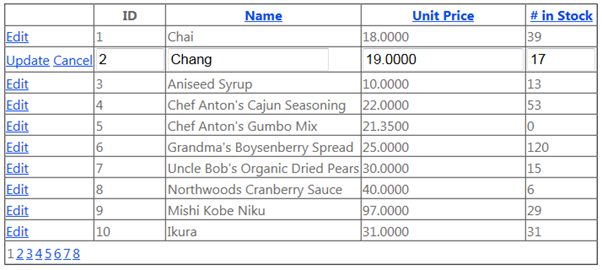
When we run the page now, we can click one of the ‘Edit' links next to a record to put it into edit mode:
We now need to implement the UpdateProduct() method in our page code-behind. There are a couple of approaches we can take when doing this.
Approach 1
Our first approach will cause the Web Forms model binding system to pass a Product instance to our update method, which we can then use to attach to our EF code first context and apply its values to the database:
public void UpdateProduct(Product product)
{
// 'product' was implicitly model bound using data-control values
_db.Entry(product).State = System.Data.EntityState.Modified;
_db.SaveChanges();
}
Our method above takes a single parameter of the type the GridView is bound to - which is the ‘Product' type. When the UpdateProduct method is invoked by the Model Binding system, it will implicitly create an instance of Product and attempt to bind the values from the data-control (our GridView) onto its members. Our UpdateProduct method then tells EF Code First that the state of the product object was modified - which will cause it to mark that object as changed, before finally saving the changes.
Approach 2
While this approach works for simple cases, often your data-control won't be able to provide values for every member on your data object, because they weren't rendered to the page or they represent relationships to other objects. In those cases, it's a better approach to first load the object to be updated from the database (using its primary key), and then explicitly instruct the Model Binding system to bind the data-control values onto the members it can. Let's change our update method to use this approach:
public void UpdateProduct(int productId)
{
var product = _db.Products.Find(productId);
// Explicitly model bind data-control values onto 'product'
TryUpdateModel(product);
_db.SaveChanges();
}
This time, the Web Forms Model Binding system will populate the productId parameter from the data-controls DataKeys collection (it does this implicitly; no value provider attributes are required). We then retrieve the product from the database, and call TryUpdateModel to model bind the values from the data-control onto the object. Once that's done, we save the changes to the database.
Model Validation
Of course, most data models include some type of validation rules. To facilitate this, the Model Binding system in Web Forms supports model validation using the same validation attributes from the System.ComponentModel.DataAnnotations namespace that ASP.NET Dynamic Data, MVC, Entity Framework and Silverlight RIA Services does. You can decorate properties on your model classes with these attributes to provide further information about the "shape" of your model, including details about which properties require a value and the range of valid values.
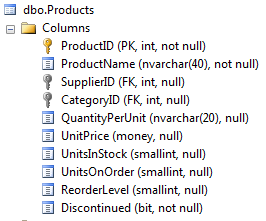
Let's update our Product class with validation information matching the schema in the database:
We can do this by adding the following attributes to our Product class:
public class Product
{
public int ProductID { get; set; }
[Required, StringLength(40)]
public string ProductName { get; set; }
[StringLength(20)]
public string QuantityPerUnit { get; set; }
[DataType(DataType.Currency)]
public decimal? UnitPrice { get; set; }
public short? UnitsInStock { get; set; }
public short? UnitsOnOrder { get; set; }
public short? ReorderLevel { get; set; }
public bool Discontinued { get; set; }
public int? CategoryID { get; set; }
public virtual Category Category { get; set; }
}
Now, when values are model bound onto this type, the Web Forms Model Binding system will track whether any of these validation rules are violated in the page's ModelState property. We can then explicitly inspect the property to ensure the model state is valid before saving changes:
public void UpdateProduct(int productId)
{
var product = _db.Products.Find(productId);
TryUpdateModel(product);
// Check whether there were any validation errors
if (ModelState.IsValid)
{
_db.SaveChanges();
}
}
To have these model state errors shown on the page when they are invalid, we can add an <asp:ValidationSummary> control, with its ShowModelStateErrors property set to true:
<asp:ValidationSummary runat="server" ShowModelStateErrors="true" />
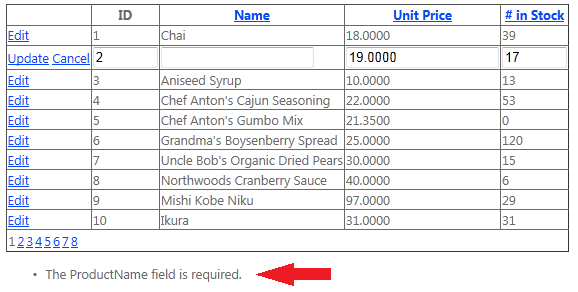
Now, if we try to update a record with an invalid value, the GridView will stay in edit mode and the model state error message will be displayed by the ValidationSummary:
You can also add custom or ad-hoc error messages to the page's model state, to represent other error conditions not covered by the validation attributes. Just like with ASP.NET MVC Controllers, the Web Forms Page base class now has a "ModelState" property that you can use to populate custom error messages that validation controls within the page can access and use to display any error message you want.
Quick Video of Modeling Binding and Filtering
Damian Edwards has a great 90 second video that shows off using model binding to implement update scenarios with model binding. You can watch the 90 second video here.
Summary
The Model Binding system in ASP.NET Web Forms 4.5 makes it easy to work with data and user input using a code-focused data-access paradigm. It borrows some of the model binding concepts we first introduced with ASP.NET MVC, and supports a consistent way to use DataAnnotation attributes across both MVC and WebForms to apply validation behavior to model objects. All the techniques shown here can be equally applied to the other data-controls in ASP.NET Web Forms including the FormView, DetailsView and ListView.
Hope this helps,
Scott
P.S. In addition to blogging, I use Twitter to-do quick posts and share links. My Twitter handle is: @scottgu


